Yo, let’s talk about lash extensions!
So, you’re thinking about getting lash extensions…but what are they exactly? Well, my lovely peeps, lash extensions are individual fibers that are meticulously placed on your natural lashes, making them look fuller, longer, and more voluminous. They can give your eyes that extra pop you’ve been wanting and make you feel like the badass queen you are.
The benefits of lash extensions are endless. Not only do they save you time and effort in your daily makeup routine, but they can also make you feel more confident and beautiful without having to rely on makeup all the time. Plus, they’re perfect for special occasions or even just to wear on a day-to-day basis.
But hold up, there are different types of lash extensions? Yes, indeed, my friends. There are three main types to choose from: synthetic, mink, and silk. Each type has its own unique texture, thickness, and durability, so it’s important to choose the right one for you and your lifestyle.
Before we get into the nitty-gritty of applying lash extensions, let’s talk about the supplies you’ll need. You’ll want to make sure you have lash extension adhesive, tweezers, a lash isolator, a lash brush, and lash pads or cushions. It takes a little bit of practice, but with the right tools, you’ll be a lash extension pro in no time.
Let’s Talk About Lash Extension Types and Which One is Right for You!
Now that you’re considering getting lash extensions, it’s crucial to understand the different types available and which one suits you best. You can choose from synthetic, mink, or silk extensions, and each has its pros and cons. Synthetic lashes are affordable and perfect if you’re on a budget, but they have a stiffer texture than the other options, leaving them less natural-looking. Mink lashes, on the other hand, are 100% natural, blending easily with your natural lashes, creating a beautiful and realistic effect. They’re pricier, so you can opt for Silk extensions. They’re in between Synthetic and Mink, giving you a natural and affordable look.

When selecting your lash type, consider factors like your lifestyle, budget, and personality. Each type can work well for everyone, but it depends on what you want to achieve. If you’re going for an elegant, natural look, mink lashes are perfect for you. If you want a bold and affordable look, synthetic lashes are your best bet.
Ultimately, remember that lash extensions are supposed to make you feel great and enhance your natural beauty. Don’t be afraid to experiment and try new things, and with the right type of extension lashes, you’ll achieve your dream look in no time!
Get Ready to Apply Lash Extensions! Supplies You’ll Need
Hey, guys! It’s time to get started on applying lash extensions! Before we begin, it’s important to have all the necessary supplies at hand. Here’s what you’ll need:
Lash Extension Adhesive
This is a must-have for applying lash extensions. Pick a high-quality adhesive that dries quickly and doesn’t irritate the eyes.
Tweezers
You’ll need tweezers to isolate individual lashes and apply the extension. They should have a good grip and be easy to handle.
Lash Isolator
A lash isolator tool is used to isolate an individual lash from the others. This makes it easier to apply the extension without damaging any other lashes.
Lash Brush
A lash brush comes in handy for separating the lashes and making them look neat. It helps in ensuring the lashes are separated and don’t stick together when applying the extensions.
Lash Pads/Cushions
You’ll need these to keep the eyelids in place while applying the lashes. They protect the eyes and make the process more comfortable for the client.
Having the right supplies makes all the difference in achieving beautiful, long, and natural-looking lashes. Any other tips for applying lash extensions? Let me know in the comments below!
Get Your Eyelashes Ready: Preparing for Lash Extensions
Before applying lash extensions, it’s important to prepare your eyelashes properly. This step ensures that the extensions adheres correctly to your lashes, giving you a longer-lasting and more natural-looking result.
A critical first step is cleaning the eyelids. I use an oil-free makeup remover to take off any makeup or oil residue that could prevent the adhesive from bonding properly. After that, I apply a primer to the lashes. A lash primer helps to remove any remaining oils and cleans any remaining dirt on the lashes, helping the extensions bond better.
It’s also essential to let your client’s skin breathe before you apply any lash extensions. I recommend taking a few minutes of silence so they can relax and close their eyes to prevent any water or makeup residue from brushing the lashes. If you do not take this step, the natural oils will keep the adhesive from sticking to the lashes.
Remember that the preparation stage is also an excellent opportunity to get to know your client better. Ask if they have any allergies to the products you’re using or any previous negative experiences with previous extensions; this information will help you adjust the process accordingly and ensure the best results for your client.
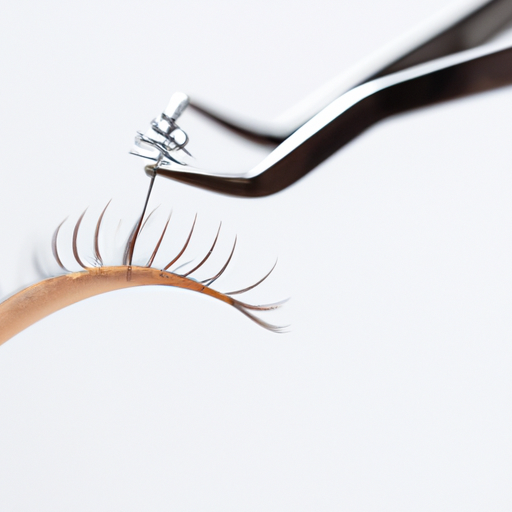
Once the eyelashes have been prepped, we can move onto the application process. The next step is to isolate the lashes. It’s crucial to isolate each lash hair so they don’t get tangled or clumped together while you’re applying the extensions. We achieve this by using a lash isolator and lash pads, these tools help to separate the bottom lashes from the top.
My Expert Tips for Applying Lash Extensions
Now comes the exciting part — applying the lash extensions! It might seem intimidating at first, but with a little know-how and practice, you’ll be a pro in no time. Here are my top tips for flawless lash application:
First, use a lash isolator tool to separate each individual eyelash before applying the extension. This makes sure that each lash gets its own extension and prevents clumping.
Next, determine the length of the extension by measuring it against the natural lash. The extension should be slightly longer than the natural lash for a fluttery effect, but not too long that it looks fake or weighs down the natural lash.
When it’s time to apply the adhesive, make sure to use a high-quality, professional-grade adhesive and apply it only to the base of the extension. Too much adhesive or not applying it properly can cause the extension to slide or fall off.
Once the adhesive is applied, carefully place the extension onto the natural lash. Use a lash cushion to support the natural lash and make it easier to apply the extension. Gently press the extension onto the natural lash, making sure it is securely in place.
Finally, remember to take your time and be patient. Applying lash extensions can be time-consuming, but the results are worth it. With practice and the right techniques, you’ll be able to create a stunning set of lashes that will last for weeks.
Aftercare Tips for Lash Extensions
Okay, you’ve got your stunning new lash extensions installed, and they look fabulous! But what’s next? You need to keep them safe, so they last longer and look beautiful throughout. Therefore, here are some aftercare tips to help you.
First of all, water is the enemy of lash extensions! So make sure you avoid full and frequent water contact, especially during the first 24-48 hours. That means no swimming, steam rooms, saunas, or hot tubs- sorry, you’ll have to take a break!
Also, oil-based makeup can weaken the adhesive bond, so it is better to avoid them altogether. Stick to water-based cosmetics, instead, and if you must use mascara, use it only on the tips and avoid volume-boosting variants.
You will also need to wash your lashes regularly with a clean mascara wand or lash brush. A gentle, special lash shampoo is recommended for this purpose. But please do not use cotton pads or q-tips as the loose fibers can get stuck in the extensions.
Finally, take care when combing the lashes, always working from root to tip with a light and gentle hand. A lash comb, preferably with soft bristles, is ideal for this purpose.
And that’s it! Follow these aftercare tips, and your lash extensions will stay beautiful and last longer. Have fun fluttering those lovely lashes!
Conclusion: So, are Lash Extensions Worth It?
And there you have it, folks: Everything you need to know about lash extensions! Hopefully, this information has been helpful in your decision on whether or not to get lash extensions. As for me, I can confidently say that lash extensions are definitely worth it. They are convenient, time-saving, and give you that extra boost of confidence to take on the day.Of course, it’s important to keep in mind that lash extensions require a bit of maintenance. It’s essential to follow aftercare tips to ensure that your extensions last as long as possible. But with some effort on your part, you can extend the life of your lashes and make them look natural.Finally, if you’re looking for a reliable lash extensions boutique, check out Wink’s Eyelash Boutique. Their experienced team of eyelash technicians specializes in creating natural-looking lash extensions that suit your eye shape and enhance your natural beauty. Their website, https://winkseyelashboutique.com/achieving-a-natural-look-with-lash-extensions/, is full of useful tips and information that you won’t want to miss.So, what are you waiting for? Give lash extensions a try and see for yourself how they can transform your look. I promise you won’t regret it!